It took me a while googling to find why height in
is not rendered as I expected in IE (Internet Explorer), when I use code like;
<style>
…
td.under {
…
height: 9px;
…
}
</style>
<td class="under" onclick="insertRow(this, verAttribute)" onmouseover="onSideOver(this)" onmouseout="onSideOut(this)">
<img src="img/add.gif">
</td>
But, it didn’t help much. I find the answer in the Technet of Microsoft.
Many people have already knew that IE is working differently than other browser. Well, actually, most browsers are acting somewhat differently from each other. Fortunately, many of the differences in terms of using HTML tags or DOM elements are rather perceivable, if I use informative tools like Aptana. Still, most of the tools do not describe why <td> is rendering differently in IE. So I decided to add any findings in this column starting from <td>.
1. The height of <td> does not seem to work in IE.
The size of <img> is not easily controlled unless I wrapped the image inside <td>, especially in IE. In many cases, if I use “Source Formatter” or developer’s habit to separate <td> and </td>l; with CRLF, which means separated by new line, another DOM object is added. (This can be checked easily using firebug add-on.) And this cause IE to behave differently when deciding height of <td>.
If it happens, even if I enforce the height of cell with height attribute as in above example, IE re-calculate height of the cell using another new line. Which make the cell grow to the size of text. To avoid this and if you’re really considering to use your HTML code also in IE, <td> and </td> should not be separated by new line. So, if I fix above code like this;
<td class="under" onclick="insertRow(this, verAttribute)" onmouseover="onSideOver(this)" onmouseout="onSideOut(this)"><img src="img/add.gif"></td>
Then, the height of the cell in IE is rendered the same height as in Firefox.
After I installed Linux on my laptop, I was able to connect and use any files in my desktop, just like old days with servers. Using SSH, Secure SHell which installed as default, I could connect to desktop and control my work from remote. However, for my laptop to accept connection, I installed openssh-server by typing sudo apt-get install openssh-serverAfter that I need to alter configuration file to protect my desktop. By changing the file, /etc/ssh/sshd_config, I could block any other connection except from my laptop. For example, if I uncomment “ListenAddress” and assign only one IP address, I could block virtually all connection attempt from outside. And if I change “PermitRootLogin” to false and add only one user name in “AllowUsers,” I could permit only myself into desktop as non root account. Once I finish my configuration, I could connect my desktop by typing ssh 192.168.2.1 -l usernameAfter I looked for the path where my game file was located, I could copy the file into my laptop by typing rcp username@192.168.2.1:/home/sweethome/Desktop/yofrankie_bge.zip .from another terminal in my laptop. Then I decided to watch movie in my desktop folder from my laptop. Because I didn’t want to move movie file into my laptop, I mounted the folder in one of my local folder. To do that, I first installed Secure SHell File System, sshfs, by typing sshfs username@192.168.2.1:/media/disk-1/ ~/mntOf course, I needed to create mount point ~/mnt before I mount. I also needed to synchronize some of my folder with my desktop. So I installed Unison both on my laptop and server by typing apt-get install unisonAdditionally, I installed GUI interface for my laptop by typing apt-get install unison-gtkAfter the installation, I ran Union client under “/Applications/Accessories" menu. When Unison ask me to enter root 1 and root 2 folders to sync, I entered one local folder /home/laptop/memosand one desktop folder name like this
ssh://username@192.168.2.1//home/username/memosThen the GUI came up and I could synchronize memos. And I don't have to worry about sharing my folder any more. More information can be found in following URL’s: http://www.openssh.com/ (For Secure SHell) http://fuse.sourceforge.net/sshfs.html (Secure SHell File System) http://www.cis.upenn.edu/~bcpierce/unison/ (Unison)
My new laptop was finally arrived. Because of the recession, most laptops were selling in lower price than they’re expected in usual market. So, I got my new one in one third price of what I paid for the old one three years ago. Ever since I decided to quite my job to join CMU, I’ve gradually moved to open source and free softwares. As a result, I seldom boot into Windows system in these days. And finally, I decided to use Ubuntu as my main OS rather than Windows. Ironically, I used to use Windows as main OS and Linux as secondary or working environment while I worked for Unix company. However, it was not as easy as Windows system to make my machine running. Thanks to new Jaunty, my work was reduced a lot. I wanted to record how I did to help others and myself. 1. Installation considerationsWhen I was working for the company, I used to divide a cluster of drives in logical partitions to make the system fast and extensible. Dividing consideration was usually i) which portion of system would need faster access, ii) which would be increasing most, iii) which would need to be replaced, iv) which parts would be simultaneously accessed, v) what’re the nature (OS core, DB, Log, File holder, etc), and so on. So, the first thing to consider was dividing hard disk. To do that I asked myself, “what am I doing with laptop?” “What kinds of files that I’m going to hold with my laptop?” Well, most of the time, I make some program and write documents. From time to time, I watch movies, enjoy some music and collect some data. Usually with Ubuntu but sometimes with Windows. Then I thought about what device I’m going to use with my laptop? Since I move mostly from Windows to Ubuntu, I need to support my Treo, iPod, as well as bluetooth mouse I use to use. Of course I need to take advantage of internal device of Dell Vostro 1330. 2. InstallationMost of installation is automated in Ubuntu just like Windows (or maybe simpler than Windows). The only thing I have to seriously consider during installation was partitioning. With the answers to my questions in mind, I decided to divide my hard drive into five parts. a. Recovery (Dell allocated),
b. Windows OS, (shrink into half to share common and casual files)
c. Ubuntu 9.04, (at most 40G to hold only OS and open source software)
d. swap for Ubuntu (3G same as my laptop's memory)
e. Data (the rest for holding most of projects files and home folders under /home)
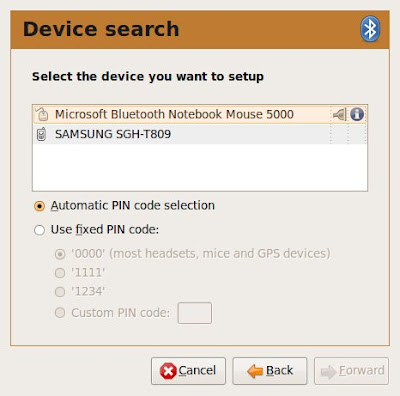
I divided Ubuntu into two / and /home to separate data from program because I didn’t want to be disturbed by the possible re-installation of Ubuntu in the future. So, I chose manual partitioning and first resize Windows partition. (Thanks to partman, I can safely resize Windows partition by just editing the size.) And created new partitions as I planned. It manual installation creating swap partition is necessary, and usually make same size as memory. (If needed, swap can be increased during operation using swap command like mkswap, swapon. However, unless I planned to use large program like Oracle DB, increase is seldom needed) That’s all I need to do during installation. 3. Bluetootha. Microsoft Notebook Mouse 5000Because of small touch pad, I really wanted to use mouse as soon as possible. Fortunately, I could see bluetooth symbol in the panel. That means I don’t have to worry about adding bluetooth stack into kernel. So, I was ready to pair my devices. I first clicked bluetooth symbol and select “Setup new device.” After wizard dialog appeared, I moved into “Device Search” section by pressing “Forward.” Either I choose "Automatic” or "Use Fixed PIN Code" with 0000, in this section, pairing result said successful. However, the LED in MS Mouse was still blinking. Meaning MS Mouse was not paired, yet. I found answer in a corner of forum somewhere in launchpad. After some struggling, I found correct procedure. First, I needed to install bluez-compat package with command; sudo apt-get install bluez-compatThen turn off and on MS Mouse. Again make mouse into pairing mode by pressing small button in bottom. When I saw LED blinking, type
hidd –searchthen the LED of mouse was gone, means that you are finally paired. The mouse keep paired even after reboot or resumed. b. The Treo755p. The next challenge was smart phone, Palm Treo755p. I said challenge because I suffered enough last I tried with my desktop. However, this time, I was actually surprised to see that new gnome-pilot was supporting bluetooth. I used to follow guide like “ Palm Bluetooth How-to to make my Treo to sync with Evolution. It was much easier now in Jaunty, Ubuntu 9.04. My procedure was simple. First, pair palm and laptop. As before, just followed wizard after pressing bluetooth symbol in pannel. This time I needed to use “Fixed PIN code” and my PIN number to pair with Treo. Next, I launched gnome_pilot by choosing the menu, System\Preference\Palm OS Device, and followed the wizard. Some errors came but ignored the message and follow the instruction, except selecting bluetooth as communication device. That’s it. Now I was able to sync with Evolution through bluetooth. I selected usual conduits to sync with contact, calendar, menu and todo data in Evolution. c. iPod. I chose Banshee to manage my music in iPod. It looked that Songbird was still unstable somehow, and Amarok asked me to install KDE libraries. After the installation, everything works fine, except album photos. It was not a big deal to me now, so I moved on to the next.
When Eclipse came out to public as free, I was using various other IDE's to make programs. Most of them was not free, so I could not use them as I wanted, unless it is provided to me. Naturally, I fell in love with Eclipse when I first saw it, althgouth it was not as fancy as commercial IDE's. Eclipse now-a-days is a lot stronger, faster, and flexible than before. But sometimes it does not work as it supposed to be, as least to the users, especially if you've never encountered the problem before. 1. Eclipse does not start.It happens time to time, when you install a newer version of a new installation of Eclipse for some reasons. (I'll grab some image or copy of error message, if I make one) The first thing to check is, whether you are using the correct version of Java? It may be easy, since Eclipse will tell why it is not working. But if you're working with lots of plug-ins and updated regularly, you may not notice what's happening inside Eclipse. For example, under Eclipse 3.4, some plug-ins, for example latest version of CDE, require Java 6 to work properly, instead of Java 5 which is required in Eclipse 3.4. But Eclipse does not say much about that on screen. Checking Java version is first thing to do. The next thing to check is multiple Java Runtime. If Eclipse does not start, even if you checked and confirmed correct version of Java is installed on system, you may have multiple version of Java Runtime. I saw this case in Microsoft Windows environment from time to time. It is possible that you installed Java Runtime by the request of web site to run some applets or programs in the past and forgot about that. In that cases, Eclipse does not run no matter how many times you remove and install new version of Eclipse. The simple remedy is to add following line in eclipse.ini file which exist right under ./eclipse directory. (Or you may just remove unnecessary Java Runtime.) vm
C:\Sun\SDK\jdk\bin\javaw.exe This is just an example, and the path of "javaw.exe" is depend on where you've installed your Java. if you're using Linux, it will be like vm
/usr/share/java/jdk1.6/bin/java You have to remember that path must be placed in the right next line. And don't put it between the pair of arguments. So it may be better to place it at the end of file. 2. SVN is not working.This is another disturbing and time consuming case, if you are not familiar with error. This happens mostly in Linux environment, and the main cause is JavaHL native library. Typical error message is “Unable to load default SVN client,” if you're using Subclipse. If you're using only remote repositories and you have more than on client installed, the solution is simple. Change the default SVN client. You can change SVN client by changing Client field, under the menu of “\Window\Preferences” and under \Team\SVN category. Or if you're using "Subversive," you can change SVN connector under "SVN connector" tab. All you have to do is select other SVN client than “JavaHL(JNI),” such as SVNkit. But if you're using local repositories and want faster access, you may have no other choice but to use "JavaHL". The procedure is as follow. First, you need to install libsvnjavahl library, because "Subclipse" or "Subversive" does not comes with it. You can search the package name like libsvn-java using sudo apt-cache search libsvn Then install package using sudo apt-get install libsvn-java then, you may have to check the version of libsvn you've installed, in case you do not remember. Type sudo apt-cache showpkg libsvn-java If you have a package manager like “Synaptic Package Manager,” you may install and check the version inside package manager. Current version of Ubuntu comes with 1.5.4 version of libsvn-java. Thus you can only install 1.4.x version of subclipse for Eclipse 3.2, 3, or 4. If you want 1.6.x version of subclipse, you need higher than 1.5.x version of libsvn libaray. Next step is as before, modify eclipse.ini. This time you need to pass an argument to Java VM by adding following line
-Djava.library.path=/usr/lib/jni
and this should be placed below “-vmargs” So, the tuple will be like
-vmargs
-Dosgi.requiredJavaVersion=1.5
-Djava.library.path=/usr/lib/jni
Then, you can check the client in the preference, under the menu of “\Window\Preferences” and under \Team\SVN category. If it is working, "JavaHL" and version number will be displayed in client combo box, if not, it will say “JavaHL(JNI) Not Available.” If that happens your Eclipse is not loading eclipse.ini file you modified when it boot up. And example of this case is when you've registered Eclipse in the menu with different working directory. Then all you have to do is find the correct place to put eclipse.ini.
|